
How to Build a Mud Kitchen

By Megan Haynes
As part of our nature explore outdoor classroom, we wanted to create a “messy materials” area where children could have access to a variety of open-ended materials. We know that mixing soil, sand, water, and a range of other natural materials (flowers, sticks, pinecones, leaves, etc) has an important role in early childhood. Research shows that direct exposure to the natural world encourages a sense of wonder and imagination along with supporting physical, social, and cognitive development. Also, it is simply so much fun!
Nature educator, Jan White, further describes how mud kitchens work in outdoor play:
Mud kitchens provide something quite different to a soil digging patch, whilst also being much more easily managed. A mud kitchen includes elements of the much-loved domestic corner and cooking from indoor play, which are then hugely enriched through the special nature of being outside.
Choose the Place
If possible, select a corner of your outdoor space to put your mud kitchen. The corner makes your kitchen feel cozy as a separate area of play. We added our mud kitchen next to the play house and the stage which enhance each other, enriching the experience for children. You’ll want to have an ample supply of sand and/or dirt that is easily accessible to the children. A water supply is a must but you can decide if you’ll want to collect the water in containers or an outdoor tap. I prefer filling up a large jug (amazon or thrift store) where the kids can independently get the water they need. Plant material, flowers, gravel, pebbles, sticks, are other natural companions for concoction making. I hit up the local thrift store to find my kitchen pots, pans, spoons, etc.
While a mud kitchen can be as simple as putting out all of the materials above, we wanted to create a permanent area in our preschool play area. My amazing father-in-law designed and built our mud kitchen and I’ve included his instructions below.
How to Build a Mud Kitchen
Step 1 - Find an old kitchen sink
We visited ReStore to find our used kitchen sink for $10. We recommend getting the standard size with two separate basins but any sink will do and you can adjust your measurements around it.

Step 2 - Purchase the Materials
Our finished mud kitchen was 60” long table. You will need the following:
39 feet of 2x6 (for the surface, back, frame, etc)
12 feet of 4x4 (for the legs)
Small box of Wood screws - 3 1/2 inch for the legs to the frame
Small box Wood screws - 2 1/2 inch for everything else
The majority of our wood we saved from our old pine wood deck. You can purchase a similar type of wood at Sears Trostel in Fort Collins or check craigslist for people selling old wood.
Step 3 - Cut the posts and make the frame
Here’s a sketch of the mud kitchen along with the actual size of the pieces to cut.
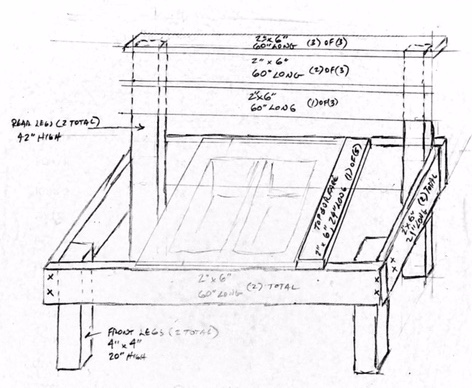

Step 4 - Make the surface area.
You’ll want to measure the sink depth and adjust a 21” dimension to fit the sink. Also, make sure you include spaces between the boards for moisture to get through.

Step 5 - Add back boards and hooks
We added a back to hang pots, pans, spatulas, and large spoons. We found small hooks that you can easily hand screw into the wood.

The kids love this new addition to our outdoor classroom and please reach out if you have any specific questions! You can reach me -- megan@rootsandwingsfc.com